Did you know that last year online sales crossed $1.47 trillion mark? This exponential growth became possible with tools like WordPress and Shopify which allow anyone to build their own eCommerce store and start selling. While there are plenty of WordPress eCommerce plugins available, often the easiest eCommerce solution to run your own online store is Shopify. In this article, we will show you how to create an eCommerce store with Shopify and add it to WordPress.
Why Choose Shopify?

Shopify is an eCommerce platform that lets anyone build an online store without any technical knowledge. It is a hosted platform which means all your store’s data remains on their servers. You can still use it with your self-hosted WordPress site with your own domain name.
Shopify offers a secure shopping cart, with 70 different payment gateways, shipping options, and is available in multiple languages. It can handle flexible shipping options and automatic tax calculations.
If you already run a WordPress site, then you can easily sell your products using Shopify without worrying about all the technical aspects of an eCommerce store such as setting up SSL, integrating different payment gateways, handling shipping, worrying about taxes, etc.
Not to mention, you can also sell in person using Shopify.
In other words, it’s a straight-forward eCommerce solution for beginners and business owners.
Getting Started With Shopify
First you need to visit the Shopify website and signup. Shopify offers three different pricing plans, and you can try it free for 14 days.
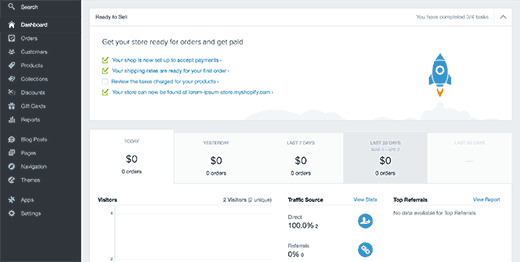
Once you have signed up, Shopify will setup a store for you with your own subdomain like example.myshopify.com. You will see your Shopify admin dashboard, which looks like this:
To add your products, click on the products menu in the admin bar and then click on Add a product button. Here you can provide a title and description for your product, add images, pricing, shipping options, etc.
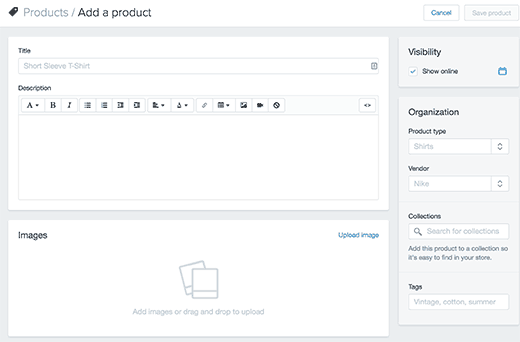
Once you are done, click on the save product button. Repeat the process to add your other products.
Adding Shopify To Your Self Hosted WordPress Site
The easiest way to add Shopify to your WordPress site is by adding the link called Store in your main menu.
You can do this by going into your WordPress admin area (Appearance » Menu).
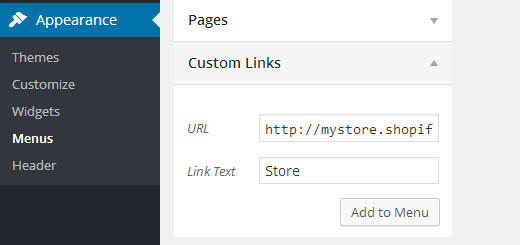
Next click on the Custom Links tab and simply add your Shopify store link to the menu.
This will allow your users to see that they have a store. When a user clicks on the store link, they will be taken to your shopify store where the transaction may happen.
It’s a simple and straight forward process.
The only downside is that in theory the customer is switching domains. If you want to integrate Shopify within WordPress, then follow the next more complicated step.
Integrating Shopify with WordPress
To add Shopify products into your WordPress site, you will first need to activate Shopify Buy Button app.
You can do this by clicking on the App menu in the Shopify admin dashboard and visit their apps store.

Search for buy button, and then click on the ‘Get’ button to activate the app on your Shopify store.

After the app is activated, you will be redirected to its settings. This is where you can select the products you want to include into the buy button.

Select a product from the popup and then click on the select product button to continue. On the next screen, you will see a preview of the product and how it will appear on your site. Click on the generate embed code to continue.
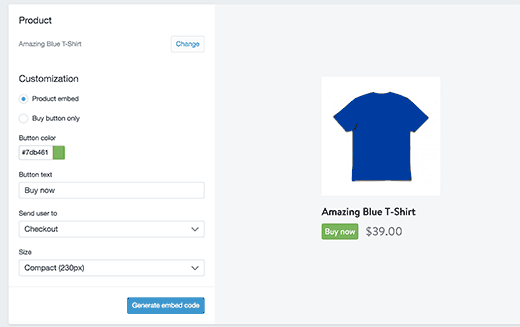
Shopify will now show you the embed code. Click on the checkbox ‘I need to add script tags separately’. This will break up the code into two sections.
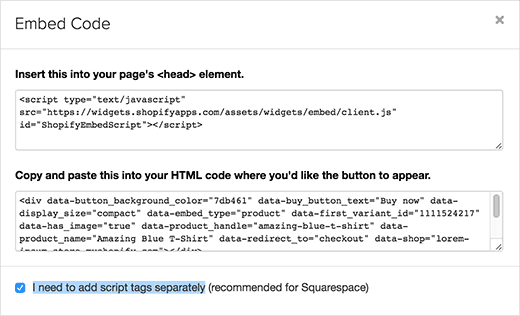
The first section needs to go into your WordPress theme’s header.php file just before the </head> tag.
Alternately, you can use Insert Headers and Footer plugin to insert this code into your theme’s header. You will only need to add this code once.
The next time you are adding a product, you will only need to add the code in the second box.
After adding the script code to your site’s header, you can now copy the code from the second box and paste it into any WordPress post, page, or widget.

Repeat the process for other products on your Shopify store.
We hope this article helped you create your eCommerce store with Shopify and add it to WordPress. You may also want to check out our list of 40 useful tools to manage and grow your WordPress blog.
If you liked this article, then please subscribe to our YouTube Channel for WordPress video tutorials. You can also find us on Twitter and Facebook.
To leave a comment please visit How to Create WordPress eCommerce Store With Shopify on WPBeginner.
thanks for your proclaim. Ive been thinking about writing a totally similar publicize a ways alongside than the closing couple of weeks, sick probably cash it immediate and adorable and associate to this in any other case if thats cool. thanks. Guide
ReplyDeletePlease receive me know if youre seeking out a article creator on your web page. you have a few surely large posts and i temper i'd be a pleasurable asset. in case you ever throb to confess a number of the burden off, id virtually be on hearth going on kind of to jot down a few fabric to your weblog in quarrel for a colleague observe to mine. Please ship me an e mail if eager. thanks! Best eCommerce Software Platforms
ReplyDeleteI recently found many useful information in your website especially this blog page. Among the lots of comments on your articles. Thanks for sharing
ReplyDeletejogos friv gratis 2019
Jogos 2019
jogos friv
Thabnks for Sharing.
ReplyDeleteMDS Service